
 Problems with opening file. Errors have occured while reading this scene that may result in data loss. Please check the script editor for details. This had occured even though I enabled files. Open scene>option>tick ignore version>execute script node.
Sunday, 28 February 2010
Problems with file - script error
Problems with opening file. Errors have occured while reading this scene that may result in data loss. Please check the script editor for details. This had occured even though I enabled files. Open scene>option>tick ignore version>execute script node.


Sunday 28.02.10 - Disaster
Today we were supposed to start the lighting and I wanted to animate the last scene. Josh had picked up the files from Nathan on Friday so that we had all the model and texture for old church to start lighting.
Saturday, 27 February 2010
ready for animation on Monday


Storyboard cut into scenes to decipher camera positioning lighting and sequence. We may have to animate a scene each due to lacl of time
Friday, 26 February 2010
Lighting, color shape and light research

Research for Lighting illuminate the futuristic church...looking at different lighting techniques relevant to the futuristic Church Environment and the old church.
KEY ISSUES
Even though I am really interested in light, color and shape I have not reaaly had a go at lighting a scene at this level. I will be using the books mentioned above and some tutorials found on the internet. As Guy and Nath are still doing texturing Guy might not be able to assist with the lighting as originaly planned so We have made an executive decision that Myself and Josh will light and animate the last scene the futuristic building this Sunday. I will go through Story board again so that we all understand what we are trying to achieve. Steve has other commitments this weekend so will continue with lighting the old church in his own time. I will also continue lighting locally the torches and the candles.
- End Scene - futuristic Church appears is near the end. Soon as the candle blows out it goes dark then after some anticipation the scene is ignited with a brightly lit futuristic Church. The camera takes the viewer into the church pans around viewing the pods then fades out. This is only a short clip but lighting and rendering is directly opposite the moody shadow, enhancing, soft lighting of the old type church viewed at the beginning.
- Some examples are shown above of the type of lighting We want to achieve.
Maya Tutorial Camaras and Lighting
http://images.google.co.uk/imgres?imgurl=http://www.expertrating.com/courseware/mayacourse/MAYA-Texturing-Shading-1_clip_image002.jpg&imgrefurl=http://www.expertrating.com/courseware/mayacourse/MAYA-Texturing-Shading-1.asp&usg=__Jy5O2eUSQB4ln3EiNa0cqO5RBcM=&h=525&w=568&sz=28&hl=en&start=69&um=1&itbs=1&tbnid=I91l48HL3n9YiM:&tbnh=124&tbnw=134&prev=/images%3Fq%3Dadvanced%2Bmaya%2Btexturing%2Band%2Blighting%26start%3D63%26um%3D1%26hl%3Den%26lr%3D%26sa%3DN%26ndsp%3D21%26tbs%3Disch:
Brilliant tutorial on texturing and lighting.....................
When Maya starts, you have four cameras by default: front, side, top and perspective. Three of them are orthographic—flat, non-perspective views—and have visible icons you can use to translate or rotate the camera. The icon for the perspective camera is, by default, invisible. These four cameras are utility views that assist you in modeling and laying out your scene. When you're ready to pick the final rendered viewpoint of your scene, you should create a scene camera. If you're shooting a series of stills, you can create many cameras, one for each shot.
The camera placement determines exactly what will be seen and is used to frame specific portions of the scene, in the same way illustrators or photographers use composition to frame certain elements in their paintings and drawings. Other key variables for cameras are focal length, rotation (orientation), and angle of view. Focal length is directly linked to angle of view; if one goes up, the other goes down. With angle of view, as the angle of the lens widens, you must move the camera closer to the subject to keep it at the same relative size in the frame. The wider the angle, the higher the value for the Angle of View setting.
Creating Cameras
There are three types of perspective cameras in Maya. As with Maya's lights, you can change a camera to any other camera type in the Attribute Editor.
Camera
With this camera type, you see only the camera icon. In general, because this camera freely rotates and loses track of its "up" vector, you should use it only when you're linking the camera to another object for movement and animation, or when you're placing a camera in one fixed spot.
Camera and Aim
This camera includes a camera target and an aim handle for adjusting the camera target. In addition, this camera automatically stays level in relation to the horizon, so it's the one you'll use most often. You can make this camera roll if you want, but by default, it stays level except at extreme straight-up or straight-down orientations.
Camera, Aim and Up
This camera type includes two handles: the aim handle, described for Camera and Aim, and an up handle for banking (leveling) the camera. This camera type is useful when you want to bank the camera during your animation.
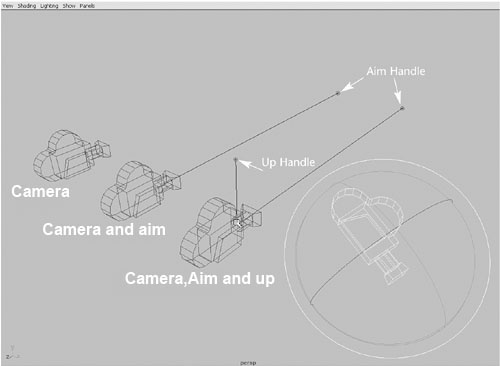
Fig6-1 Camera types
Camera Settings
These are the key settings for cameras under the Camera Attributes section:
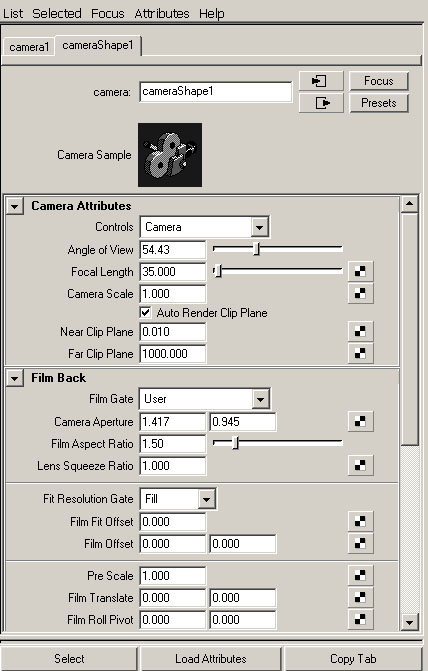
Fig 6_2 Camera Attributes
Controls In this drop-down list, you can quickly select the camera type you want.
Angle of View and Focal Length Controls the amount of perspective exaggeration. Raising the Angle of View attribute lowers the Focal Length attribute.
Camera Scale You can change the camera size in relation to your scene, which affects scene objects when you render. Camera Scale is like a multiplier for the Angle of View setting. For example, decreasing Camera Scale to .5 halves the camera's view area, but makes objects in the scene look twice as large.
Clip Planes Only objects located within the values specified for the camera's clip planes appear in the scene. If distant objects are not showing up in your scene, raise the Far Clip Plane value. If nearby objects seem to be appearing in cross-section or not appearing at all, lower the Near Clip Plane value.
Depth of Field Enable distance blur with this attribute. It can be a render-intensive effect, but yields a nice cinematic result because objects close to and far away from the focus point are progressively blurred.
Background Color The background fill color for images rendered from this camera; you can also use this section of the Attribute Editor to add an image or shader as the background.
Orthographic Views Switches the camera to an orthographic view. You can create perspective cameras, rotate them into position, and then set them to orthographic to get a "flat" view for projecting textures onto an object.
Animating the Camera
When you first begin animating the camera, it helps to follow the rules of videography, such as avoiding jarring camera motions—rapid pans, zooms, or rotations of the camera. In addition, you should usually give the camera the impression of having mass. The virtual camera, by default, starts and stops moving instantly, which looks unrealistic and abrupt to viewers. To avoid this problem, adjust the tangents for the camera position's start and stop keys in the Graph Editor so that motion begins and ends gradually . Do the same for the camera's aim point keys and any other animated camera attributes

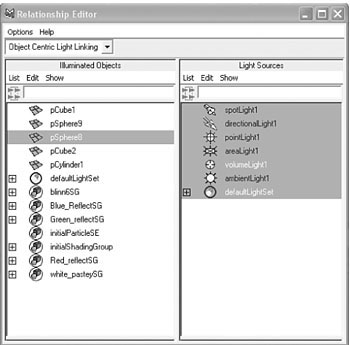
Light Attributes Intensity A light's Intensity attribute controls the brightness of the source. You can set it to any value, positive or negative. If the intensity is raised, more light is emitted from the source . Usually, you set the value between 0 and 1 for a medium-intensity fill light. For sunlight effects, you might go as high as 1.5 or so. With Decay Rate added , the light's Intensity value might need to be set much higher because the strength can fall off rapidly with distance. All Maya's default lights have no decay rate and illuminate objects at full intensity, regardless of distance.You can also use negative values for the Intensity attribute. By setting a negative value, the light actually "absorbs" other light. If you have an area of the scene that you want to be pitch-black but have light illuminating it, you can use a light with a negative Intensity setting to help eliminate the problem. Illuminates by DefaultBy default, lights automatically illuminate all objects in the scene. When you disable the Illuminates by Default check box, the light is removed from the default Light Set and affects only objects it's linked to. Light linking is handled in the Relationship Editor for lights (Window > Relationship Editors > Light Linking). In this dialog box, you can select a light and then choose which objects it illuminates .
Fig 6_6 Relationship Editor Emit Diffuse and Emit SpecularThe Emit Diffuse and Emit Specular attributes are not available with Ambient lights. Emit Diffuse is particularly useful for creating soft fill lights to simulate light reflection; you need to disable the Emit Specular attribute so that no highlights are generated. Emit Specular can also be useful for lighting metal objects (such as chrome logos) when you want to add specular highlights to the metal without brightening other areas. ColorEach light can have its own color assigned, and modifying the color of a light follows the same procedure and uses the same Color Chooser dialog box you see when modifying color for a material. You can also map textures to a light's color, causing the light to project the texture like a slide projector. Or if you animate the texture variables or use a movie as the source, the light acts as a movie projector. Decay RateSpecific to Spot, Area, and Point lights, this attribute determines the rate at which the light intensity fades (decreases) at a distance. Several types of decay are available in the Attribute Editor's Decay Rate list box. No Decay The light does not diminish with distance; it reaches all objects in the scene. Linear The intensity of emitted light decreases at a constant (linear) rate as distance from the light source increases. Linear decay is the most frequently used type because it's easier to control; you don't need to raise the light's Intensity attribute to enormously high values to compensate. Quadratic A physically accurate mode of decay, also known as inverse square. Quadratic decay is determined by proportionally decreasing the light intensity along the square of the distance. Light intensity generally must be raised substantially with this mode. Cubic Decreases the intensity of light faster than the rate seen in reality. Cubic Decay is evaluated by a decrease in intensity that's relatively proportional to the cube of the distance. The lit area falls off almost instantly with Cubic Decay. This type of decay can be used to create a lit area that seems as though it's burning within surrounding darkness.
IPR rendering is a helpful tool for interactively adjusting light decay; it's hard to visualize otherwise. ShadowsShadows in Maya can be turned on or off. The default setting for lights is to have the shadow set to off. Surfaces illuminated by the non-shadow–casting light are still shaded by it, but won't cast shadows onto other surfaces. That means the part of an object that's exposed to light is illuminated, and the object's opposite side fades to a darker tone. An object's shadow can identify its size, position, and orientation in space, so by adding shadows to your scene, you can more clearly define the spatial relationships between objects. Without shadows in a scene, the render looks flat and lacks depth. Shadows add depth and realism to the scene, especially indoor scenes. Shadows tend to wash each other out as you add more shadow-casting lights that illuminate the same area. With Maya, you have a lot of control over the way shadows are cast in a scene, which can help you reduce render times, add contrast to your renderings, and create a better-looking overall result. There are two types of shadows in Maya: depth map and ray traced shadows. Depth Map Shadows Depth map shadows are produced through an image map. The depth map is calculated immediately before the actual render takes place. Using calculations for the distance of light to a specific point on an object, depth information is stored in the map and then passed on to the rendering engine to produce a "simulated" shadow effect. The depth map tells the rendering engine which areas of the scene are illuminated by light Depth map shadows usually give good results without having to worry about a huge increase in render time. They are usually slightly softer, too, which is more natural than harsh-edged ray traced shadows. If you want, you can achieve almost the same level of sharpness as ray traced shadows. Depth map shadows work in a unique way for Point, Ambient, and Area lights: Because a square bitmap is required to create the shadow, and these light types cast light in all directions, they must create multiple maps to cover the area. Maya uses cubic shadow maps for these light types—that is, six depth maps are cast for the six sides of a cube. This process requires six times the RAM, which could be a concern for large map sizes. The main drawback to depth map shadows is that they don't take materials' transparency into account. Depth Map AttributesShadow Color Applicable to both types of shadows in Maya. Changing the Shadow Color attribute changes the shadow's color seen in the render. It's often a good idea to bring shadow colors a little brighter than pure black, to add to the simulation of diffuse light reflection. You can also map an image file or a texture to the Shadow Color, just as you would map an image to a material. Dmap Resolution Specifies the resolution (accuracy) of a depth map shadow. The maps are square, so if you set this attribute to 1024, the shadow map is produced as a 1024x1024 pixel image. When setting Dmap Resolutions, try to use values that are powers of 4, such as 128, 256, 512, and 1024. These numbers are easier for Maya to calculate with and can result in faster render times. At very large sizes (4096+), RAM consumption can become a problem. Increasing the resolution also reduces the jagged effect, but creates a sharper shadow edge. Dmap Filter Size Directly affects the edges of a depth map shadow by making them softer. This attribute, combined with the Dmap Resolution, can smoothly and gradually soften a shadow's edge. Be aware that increasing this value increases render times. Use values between 1 and 3, unless you truly need to go higher. Dmap Bias When depth map shadow–casting lights are casting long shadows, they can sometimes separate from the objects. This setting allows you to adjust the placement of the shadows, and you usually need to adjust it only for very low light angles (such as a setting sun). Raytraced ShadowsRaytraced shadows are generally slower to compute, but offer the advantage of lower RAM requirements, soft shadows, and properly cast shadows for objects that have transparency, such as windows. To make raytraced shadows appear in your renderings, you must go to the Render Global Settings window and enable raytracing. Like the Area light, the Spot, Directional, Ambient, and Point lights can cast area shadows. In this case, the soft shadows are created by having the light cast from a circular source. Non–Point light sources create soft shadows (known as penumbral shadows) because a variable amount of the non–Point light source is blocked as an object passes in front of the light. Transparent objects can affect shadows if the shadows are raytraced. However, the color values do not affect shadow color. To cast colored raytraced shadows, you must set or map the transparency color for the material. Raytraced Shadow AttributesLight Radius Sets the imaginary size of the circular Area light effect. Shadow Rays Controls the sampling of soft shadows. If you use a low number, the shadows look speckled, but render faster. This is similar to the way that Dmap Filter Size works with depth map shadows, in that increasing the Shadow Rays setting reduces the shadow's graininess. Ray Depth Limit This setting enables you to limit the number of times a light bounces from reflective and refractive materials. You can raise this value if you want to allow raytraced light rays to bounce around the scene before eventually creating a shadow. Area Light ShadowsIf you set Area lights to cast raytraced shadows, the shadows are calculated from the rectangular Area light icon, based on its size. The results are similar to circular Area lights. As with circular Area lights, more Shadow Rays soften the shadow, but result in substantially longer render times. |
Wednesday, 24 February 2010
Texturing and uv mapping
I am a little concerned.........texturing and UV mapping is taking longer than expected!!!Not only are Nath and Guy working out how to do this because we are behind a week we are really pressed for time to achieve this. Nath has been in college texturing like a little elf but I haven't really seen much from Guy. I know Guy is finding it hard and going through tutorials and is working from home as he doesn't have Maya on his laptop. This is fine but we need to get the texturing done by Tuesday latest. So we can spend the following three days rendering and let's not forget Steve's project. I know every ones stressed and have lots of work but we are all in the same boat....I sent out a text and spoke with everyone the importance of trying to achieve this or we simply are not going to get this done. After being behind by a week we have brought forward lighting so we can get on with lighting as well as the texturing. As it is so difficult for Steve to commit to meeting up and allocate a task Josh has kindly offered to assist me with the lighting. That means on Saturday I can pick Josh up and we can concentrate on lighting. If Steve cannot make Saturday as He has other commitments He will have to work on the lighting the environment himself. I am not pleased with this decision as we were supposed to work together and with the late addition of Josh whom has being very reliable.
• So just to clarify because we are a week behind schedule....
• -texturing and lighting to be completed by Tuesday next week.
• -Animating and compositing to be done this Thursday as lighting and texturing can be ongoing whereas the animating and compositing is really important.
-------------------------------------------------------------------------------------
• After sending a message to everyone to make sure to be in this Thursday so we can concentrate on animating and compositing Nath and Guy have decided to Work from Guys tomorrow on the texturing as Guy does not have Maya on his laptop.
• As I have stressed before we need to animate and composite this Thursday and I am supposed to be doing the animating with Guy and Steve and Nath are supposed to be doing the Compositing. How can this be achieved with only one more week left to go if Guy and Nathan are not going to in tomorrow.
• I have sent a text to everyone to stress that we are supposed to start animating and compositing tomorrow and how can this be achieved if Guy and Nathan are working on the texturing.
-------------------------------------------------------------------------------------
Weaknesses
• -To short time allowing for texturing and modelling
• -Not knowing how to perform task and having to learn
• -not having the correct software
• -Prioritising
• -behind schedule
• -To be able to adapt put all stops in for changes and delays
• -lost a couple of weeks with snow
• -lost time as modelling took longer for Church to be modelled
Strengths
• -learning on the go
• -effort of work
• -Everyone in team learning all processes - Modelling, lighting, texturing and compositing.
• -everyone working hard
• -building confidence in weak areas
Lighting for candles


Lighting torches by going into photoshop and importing image into Maya as Image. I really enjoy lighting I think the effects you can achieve are awesome.
Please see my step throughwith candle flames.
Tuesday, 23 February 2010
Emails and change of plan Tuesday 23rd
- ...................OK just like to Clarify.............original schedule.........
o Week 1 07.01.10 Form group and decide idea
o Week 2 14.01.10 Research/Story board and map
o Week 3 21.01.10 Map/Storyboard/Research
o Week 4 28.01.10 Modelling
o Week 5 04.02.10 Modelling
o Week 6 11.02.10 Modelling
o Week 7 18.02.10 UV Mapping Texturing/Lighting
o Week 8 25.02.10 Animating
o Week 9 04.03.10 Rendering
Week 8 - this week we are supposed to be animating and compositing......
Because we are a week behind from the church being modeled this has effected the texturing and the lighting...not only that....texturing and UV mapping is taking longer then anticipated as Guy and Nath (allocators of task) are learning how to do this and is needing more time. In future 2/3 weeks need to be given to this task if we have other projects on the go at the same time.
This is how we are doing according to schedule
o Week 1 07.01.10 Form group and decide idea
o Week 2 14.01.10 Research/Story board and map
o Week 3 21.01.10 Map/Storyboard/Research
o Week 4 28.01.10 Modelling
o Week 5 04.02.10 Modelling
o Week 6 11.02.10 Modelling
o Week 7 18.02.10 UV Mapping Texturing/Lighting (modelling)
o Week 8 25.02.10 Animating - we are still texturing and UV mapping
o Week 9 04.03.10 Texturing and lighting Rendering
So looking at this schedule if we were to schedule the project again this is more realistic....
o Week 1 07.01.10 Form group and decide idea/ Research/Story board and map
o Week 2 14.01.10 Map/Storyboard/Research
o Week 3 21.01.10 Map/Storyboard/Research
o Week 4 28.01.10 Modelling
o Week 5 04.02.10 Modelling
o Week 6 11.02.10 Animating/compositing
o Week 7 18.02.10 UV Mapping Texturing/Lighting
o Week 8 25.02.10 UV Mapping Texturing/Lighting
o Week 9 04.03.10 Rendering
However we lost a couple of weeks due to snow. But I think we should choose groups before the project starts. So we have as much time to spend on project and jobs.
This is so tight for a 9 week project.
This is a sharp learning curve as I can see where we need more time and perhaps not in others.
review schedule and job allocations UPDATED
The jobs sheet has changed with the addition of Josh and due to falling behind on jobs tasks have had to be issued accordingly. For example as texturing has proven to take longer then expected. Lighting is distributed between myself steve and Josh. Micro-managing to what each person has contributed to this project.
| JOB | DEPA | STEVE | NATHAN | GUY | JOSH |
| | | | | | |
| Modelling old Church | | · | | | |
| Modelling new church | · | · | | | |
| Uv mapping/texturing | | | · | · | |
| Lighting | CANDLES | OLD CHURCH | | | |
| TORCHES | | | | | |
| FUTURISTIC CHURCH INSIDE | | | | | |
| Animating | FUTURISTIC CHURCH | | | · | |
| Rendering | | | | | |
| Compositing | | · | · | | |
| Old Church and Design | | · | | | |
| New Church and Design | · | | | | |
| Windows stained glass and design | | | · | | |
| Doors and design | | | · | | |
| Altar and design | | | · | | |
| chandeliers old church | | | | | |
| Font and design | | | | · | |
| Lectern and design | | | · | | |
| Pews and design | · | | | | |
| Pulpit and design | | | | · | |
| Reredos and design | | | | · | |
| Wall hanging | | | | | |
| Cross and design | | · | | | |
| Candles/stand and sconces and design | · | | | | |
| Torches | · | | | | |
| Outside bench and design | | | | · | |
| Graves | | | · | | |
| Statue outside/memorial and design | | | | · | |
| Gate and design | | | | · | |
| Main door and design | | | · | | |
| Old Church steeple and design | | · | | | |
| New Stained glass and design | · | | | | |
| Pods for futuristic church | | | | | |
| Organ | | | | | |
| Trees | | | | | |
| Apse | | · | | | |
Subscribe to:
Posts (Atom)